Context switching and preemptive multitasking [0]
by Technocoder
What?
Context switching is the process of changing the currently running thread on the processor to a different thread in such a way that it can be resumed later on.
Preemptive multitasking is switching threads without the current thread explicitly telling the OS to do so (once every interval). Older OSes used cooperative multitasking, where a context switch would be made when the current thread threw a system call.
Why?
Imagine if you could only run one program at a time. Each time you wanted to switch to another program, you’d have to save your work, quit the program, and launch the new program you wanted. This is incredibly inconvenient for the typical user, and is solved by the ability to perform context switches.
Now imagine that the program went into an infinite loop or refused to allow the OS to initiate a context switch. The entire system would freeze up, rendering it inoperable. This is why preemptive multitasking is important; for security and to make sure every thread gets a chance to run on the processor.
How?
There are three main stages to tackle when doing a context switch:
- Saving the current thread’s state
- Selecting a thread to resume
- Loading the new thread’s state
A thread’s state consists of the current values of all the registers it uses. Typically this includes the general purpose registers (rax, rbx, etc) and the floating point registers. For simplicity, in exampleOS we assume that user mode programs only use the general purpose registers.
The easiest way to save data is to just push the values we want to save onto the stack. Then, to load the data back, just pop all the values from the stack in reverse order. Keep in mind that every thread should have their own stack.
Creating a timer interrupt handler
To preempt a thread we will need an interrupt to be fired every few milliseconds (or an interval of your choosing). The easiest way to do this is through the use of the Programmable Interval Timer (or PIT for short). When the interrupt is fired, the kernel will perform a context switch.
The code for configuring the PIT will not be discussed here but is very simple. See exampleOS’s implementation here. Keep in mind that you will need to unmask the timer interrupt on the Programmable Interrupt Controller (or PIC for short).
Once that is all done, create a timer handler function and set it to the appropriate interrupt vector. The vector is the first vector of the master PIC vector base (which you should have remapped to avoid it overlapping the CPU exception interrupt vectors). In exampleOS’s case, the timer interrupt vector is index 32 (because the master PIC vector base is 32).
If all goes well, the interrupt handler should be being called repeatedly.
Saving and loading state
Let’s solve the first and third stages because they are the easiest to get right.
Here, we can take advantage of assembly clobbering. When using inline assembly, if we clobber a register, the compiler pushes it onto and pops it off of the stack. By clobbering all the registers, we can get the compiler to push and pop all the registers off and on to the stack, effectively saving their state. Keep in mind that there must not be any other code or instructions before or after the clobbered instruction as this may overwrite some of the register values from before the interrupt began. Here’s what the inline assembly looks like:
asm!("" ::: "rax","rbx","rcx","rdx","rbp","rsi","rdi","r8","r9","r10","r11","r12","r13","r14","r15");
You may have noticed that the rsp register is not clobbered. This is because we explicitly
save and load it later as we need to store it when selecting a thread.
Switching to another function
Writing the entire context switch function in inline assembly quickly becomes rather tedious so we’ll call a function to execute the rest of the code.
Create an empty function for handling the rest of the context switch and then call it
with the call instruction like so:
asm!("call $0" :: "i"(FUNCTION_NAME as extern "C" fn()) : /* clobbers */ : "intel");
Inline assembly arguments are referred to with a $ and the index of the argument following
it. The "i" indicates that the argument is a constant so it can be replaced
by the function address at compile time.
Switching stacks
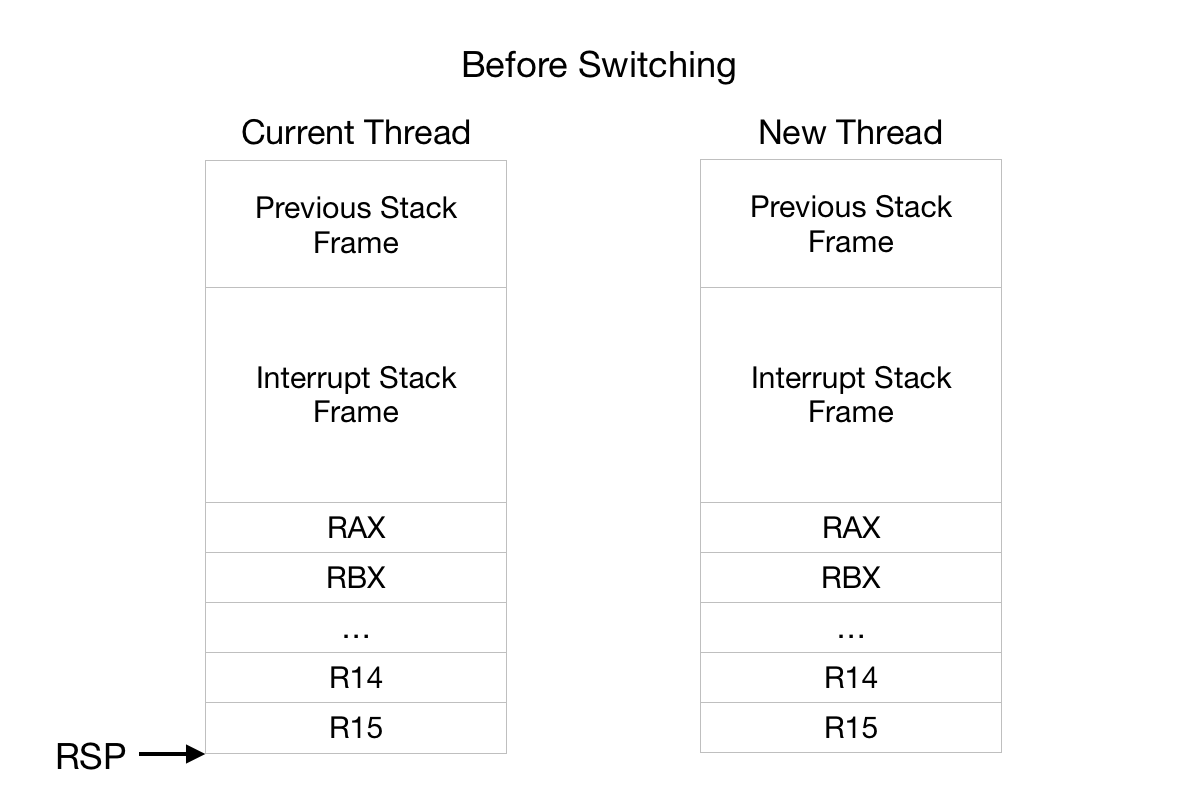
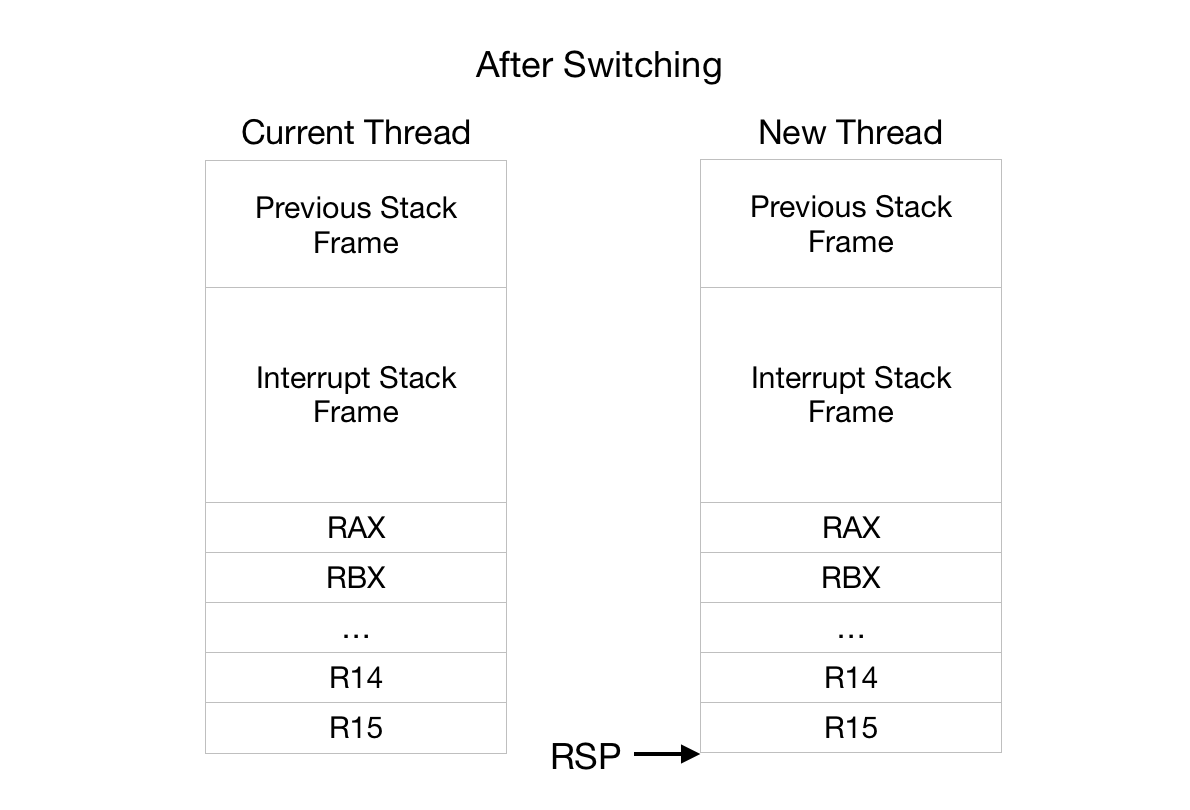
The main mechanism of how exampleOS’s context switch works is by switching stacks. Suppose we already have a few threads that have been preempted. In the middle of the timer interrupt handler, all the register values are still saved onto the stack, and so, when we switch to another thread’s stack, we can just pop of all of the values. These two diagrams shows it more clearly:


Now when the processor pops off all the clobbered values, it pops off the values that belong to the new thread, effectively restoring the state of the new thread.
How do we know what address to set the stack pointer to? Well, we explicitly store the rsp of the current
thread into some sort of structure, when we perform a context switch. Then, when we switch back, we just look at the stored
value.
First we need to retrieve the value of the stack pointer:
asm!("
mov rdi, rsp
call $0
"
:: "i"(context_switch as extern "C" fn(usize)) : /* clobbers */ : "intel");
Why rdi? According to the System V ABI
the first few integer or pointer arguments are passed in registers rdi, rsi, rdx and others. We can
then update our called function to take in the stack pointer:
pub extern "C" fn context_switch(stack_pointer: usize) {}
extern "C" fn helps ensure that the argument will be passed correctly.
We need to set the stack pointer to the new thread’s stack when we return so let’s add that in too:
asm!("
mov rdi, rsp
call $0
mov rsp, rax
"
:: "i"(context_switch as extern "C" fn(usize) -> usize) : /* clobbers */ : "intel");
Note that the return value of a function is placed in the rax register.
pub extern "C" fn context_switch(stack_pointer: usize) -> usize {}
Selecting a stack to switch to
For now, let’s just switch back to the thread that was preempted:
pub extern "C" fn context_switch(stack_pointer: usize) -> usize {
	stack_pointer
}
We’ll implement a proper scheduler in a subsequent post.
Testing it
Try running the code now to make sure it does not cause a kernel panic. Make sure that interrupts are enabled or else the timer interrupt won’t fire. If everything works, great! If not, ensure that you only have one inline assembly statement in the timer handler and that your timer interrupt vector is not overlapping another vector. You can find exampleOS’s timer interrupt handler here.
The next post can be found here (Check later!).
Back to the root